The Ultimate Homemade Eclair Guide: Pastry, Fillings, Glaze
Eclairs. Just the name conjures images of elegant French patisseries and delicate, cream-filled treats. For many home bakers, the thought of recreating these masterpieces seems daunting, a culinary Everest reserved only for professional chefs. But what if we told you that crafting bakery-quality eclairs in your own kitchen is not only achievable but also incredibly rewarding? With this comprehensive guide, we’ll demystify the process, demonstrating how you can master simple eclairs three ways – from the foundational choux pastry to luscious fillings and a glossy glaze – transforming perceived difficulty into delightful success. Forget the myth that eclairs are too complicated. We’ve distilled the process into manageable steps, arming you with detailed tips and insights that will have you churning out batches of crisp, ethereal choux pastries by the dozen. Soon, your friends and family will be marveling at your newfound patisserie prowess, all thanks to a few essential elements: perfectly puffed choux pastry, your choice of rich, creamy filling, and a decadent chocolate glaze. Let's embark on this delicious journey together!Mastering the Foundation: The Perfect Choux Pastry
Every exceptional eclair begins with a superb choux pastry, or *pâte à choux*. This light, airy, and hollow dough is the very heart of your eclair, providing that signature crisp exterior and airy interior ideal for filling. While its name might sound fancy, the process is surprisingly straightforward, relying on precise technique rather than complex ingredients.Ingredients for Your Choux Pastry:
- 1 cup (240ml) Water
- ½ cup (120ml) Milk
- 8 tablespoons (113g) Unsalted Butter
- 1 teaspoon Cane Sugar
- ½ teaspoon Salt
- 1 cup (120g) All-Purpose Flour
- 4 large Eggs (approximately ¼ cup per egg)
Step-by-Step Choux Perfection:
- The Liquid Base: In a large, heavy-bottomed saucepan, combine the water, milk, butter, sugar, and salt. Heat over medium heat, stirring occasionally, until the butter is completely melted and the sugar and salt have dissolved. Increase the heat to high and bring the mixture to a rolling boil. This ensures enough steam for the pastry's rise later.
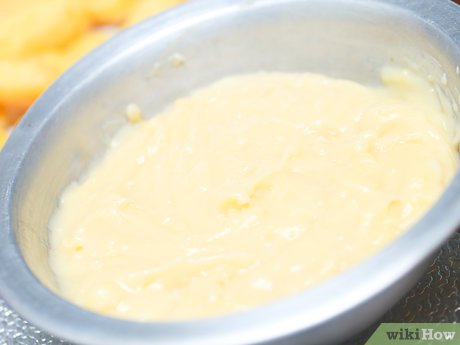
- Adding the Flour (The *Panade*): As soon as the mixture boils, remove the pan from the heat. Immediately add all of the flour at once, stirring vigorously with a wooden spoon or heat-resistant spatula until the mixture comes together to form a smooth, lump-free ball of dough. Return the pan to medium heat and continue to cook the dough for 2-3 minutes, stirring constantly. This step, known as drying out the *panade*, removes excess moisture, which is crucial for a crisp eclair. You'll know it’s ready when a thin film forms on the bottom of the pan.
- Cooling and Incorporating Eggs: Transfer the dough to a large mixing bowl and let it cool for about 10 minutes. This is critical; adding eggs to hot dough will scramble them! While the dough cools, whisk your eggs lightly in a separate bowl. Once the dough has cooled sufficiently (it should still be warm to the touch, but not hot), begin adding the whisked eggs, one-quarter cup (approximately one egg) at a time. Mix thoroughly with a wooden spoon or hand mixer after each addition until the egg is fully incorporated and the dough is smooth and glossy before adding the next portion. The dough should eventually reach a consistency where it slowly falls off a spoon in a "V" shape or holds its shape when piped but isn't too stiff.
- Piping Your Eclairs: Preheat your oven to 350ºF (180ºC). Line a baking sheet with parchment paper. Transfer the choux dough to a piping bag fitted with a large round or star tip. Pipe 8-inch long strips of dough onto the parchment, leaving space between each. Aim for even pressure to create uniform eclairs. Smooth down any small peaks with a wet fingertip. For an extra crisp, golden finish, brush each eclair lightly with an egg wash (one egg yolk mixed with a tablespoon of water).
- Baking for Crispness: Bake the eclairs for 25-28 minutes, or until they are beautifully puffed, light golden brown, and feel crisp to the touch. Resist the urge to open the oven door too early, as the sudden change in temperature can cause your delicate choux to collapse. Once baked, turn off the oven, prop the door open slightly with a wooden spoon, and allow the eclairs to cool inside for another 10-15 minutes. This helps them dry out further and prevents them from becoming soggy. Finally, transfer them to a wire rack to cool completely before filling.
Elevating Your Eclairs: Three Simple Filling Options (and More!)
This is where the magic of "simple eclairs three ways" truly shines! While the choux pastry provides the canvas, the filling brings the flavor and character. The beauty of homemade eclairs lies in the endless customization. We’ll focus on three popular and relatively easy options that promise bakery-worthy results. For more in-depth guidance on customizing your fillings and glazes, be sure to check out our article on Ways to Master Eclairs: Customizable Fillings & Glaze.1. Classic Vanilla Bean Pastry Cream (Crème Pâtissière):
The gold standard for eclairs, this rich and creamy custard is surprisingly straightforward to make. It’s thick enough to hold its shape beautifully and provides a luxurious mouthfeel. It consists of milk, egg yolks, sugar, and a thickening agent like cornstarch or flour, all infused with fragrant vanilla. For best results, prepare your pastry cream a day in advance, allowing it ample time to chill and firm up in the refrigerator. Before filling, give it a good whisk to restore its smooth texture.
2. Decadent Chocolate Pastry Cream:
A simple yet irresistible variation of its vanilla counterpart. To achieve this, simply melt high-quality baking chocolate or chocolate chips into your warm vanilla pastry cream immediately after it's cooked. The residual heat will melt the chocolate, allowing you to stir it into a silky, intensely chocolatey filling that is utterly divine. This is a fantastic way to offer variety when making simple eclairs three ways.
3. Light & Airy Whipped Cream:
For a quicker, lighter, and equally delicious option, a simple whipped cream filling is fantastic. Whip heavy cream with a touch of powdered sugar and a splash of vanilla extract until soft peaks form. For a more stable whipped cream that holds better in eclairs, consider adding a teaspoon of unflavored gelatin (dissolved as per package instructions) or a bit of cream cheese to the mixture. This filling offers a delightful contrast to the crisp choux pastry and is perfect for a fresher, less intense dessert.
Beyond the Three:
The possibilities don't stop there! Consider a tangy lemon curd, a rich chocolate ganache, or a diplomat cream (pastry cream lightened with whipped cream for an even airier texture). Experimentation is part of the fun!
Filling Your Eclairs:
Once your chosen filling is chilled and ready, spoon it into a piping bag fitted with a small round tip. Create two small holes in the bottom of each cooled eclair using the tip or a small knife. Gently pipe the filling into the pastry until it feels plump and weighty. Wipe away any excess filling for a clean presentation.
The Grand Finale: A Silky Smooth Chocolate Glaze
No eclair is complete without its signature glossy topping. A classic chocolate glaze adds both visual appeal and a final layer of rich flavor. Our preferred method uses a simple ganache – an elegant yet effortless concoction.Ingredients for Your Chocolate Glaze:
- ½ cup (120ml) Heavy Cream
- 4 oz (113g) Baking Chocolate or Chocolate Chips, finely chopped
Making and Applying the Glaze:
- Heat the Cream: In a small saucepan, heat the heavy cream over medium heat until it just begins to simmer and small bubbles appear around the edges. Do not let it boil vigorously.
- Melt the Chocolate: Remove the pan from the heat. Add the chopped chocolate to the hot cream. Let it sit for 2-3 minutes to allow the chocolate to soften.
- Whisk to Perfection: Gently stir the mixture with a whisk or spatula, starting from the center and working your way out, until the chocolate is completely melted and you have a smooth, glossy, and uniform ganache. If it seems too thick, add a tiny bit more warm cream; if too thin, let it cool slightly.
- Glaze Your Eclairs: Once the eclairs are filled, carefully dip the top of each eclair into the warm glaze. Lift it gently, allowing any excess glaze to drip back into the bowl. You can also use a spoon to spread the glaze evenly. Place the glazed eclairs on a wire rack to allow the glaze to set. For a quick set, you can place them in the refrigerator for about 15-20 minutes.
Assembling Your Masterpiece: Tips for Success
Bringing all the elements together is the final step in creating your exquisite homemade eclairs. Remember these key points for a flawless finish:- Cooling is Crucial: Ensure your choux pastry shells are completely cooled before filling. Warm shells will make your filling melt and create soggy eclairs.
- Chill Your Fillings: Fillings like pastry cream should be thoroughly chilled and firm. This makes them easier to pipe and prevents them from oozing out of the pastry.
- Warm Glaze, Not Hot: The glaze should be warm enough to be pourable and glossy, but not so hot that it melts your filling or becomes too thin.
- Make Ahead Advantage: Choux pastry shells can be baked and frozen for up to a month. Thaw them at room temperature and refresh in a warm oven for a few minutes before filling. Fillings can often be made a day or two in advance. However, eclairs are best assembled and enjoyed the same day for optimal crispness.
- Patience Pays Off: Like all baking, making eclairs benefits from patience. Don't rush the cooling or chilling steps. For additional tips and a comprehensive guide to mastering your eclair technique, explore our article on Unlock Bakery-Quality Eclairs: Your Easy Homemade Guide.
